The box under the monitor there is the brains of the whole setup. Inside there is an IPAC and the circuit board from a Microsoft Sidewinder Dual Strike, which you can still find on eBay today for around $15-$20.
My plan from the beginning was to be able to play my favorite games in MAME using the proper controls, but without having to have an extra bulky control panel with all of these extra controls built into it. It would be uncomfortable playing with the extra controls in my way, and I thought that something that big would be inconvenient to have to move around all of the time.
My original inspiration came from the controller section at Super Mappy's Page. He used a Hagstrom key encoder in a box that he had his monitor sitting on, then made multiple different controllers that would hook up to it. I decided to do something similar, and use that one box for every controller I would be using. I had already decided on an IPAC for the keyboard encoder, and 1UP's Dual Strike Hack for the Star Wars yoke and other analog controls. You can see both control boards in the pic below:

I needed quick-disconnects for each controller that would be convenient and sturdy. Any option involving soldering was a no go, as I had never done it before, and I was not ready to start the trial and error process yet. I am good at simply wiring, so I ended up going with molex connectors. These were also helpful due to Murphy's Law. With my luck, I would likely have at least one connection go bad at some point. With the molex connectors, I would just need to replace a wire here or there, compared to having to replace a whole connector if I went with something else.
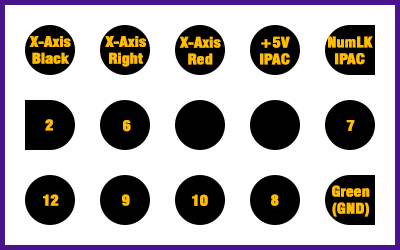
Below is how I went with the wiring. Note that of each of the two sets of connectors, the right connector is flipped horizontally to the left connector. This is to prevent plugging in the wrong plug to the wrong connector.
IPAC Wiring Map:


Dual Strike Wiring Map:


